Step-by-Step Guide for Adding an Image Carousel to the Oracle APEX Card Region

Oracle APEX Developer (Insum) from Paris Contributor of Flows for APEX Passionate about APEX and web development.
Introduction
I love the APEX Card region since it has been released in 20.2 and I like experimenting with it. I already published two blog posts about it. The first post is about using CSS Scroll Snap to enhance the user experience when scrolling cards on mobile devices. The second post explains how to implement a card's selector using CSS and JavaScript.
I thought about this one while scrolling on a real estate app to see how insane prices are in Paris, I had the crazy idea to implement the same image carousel with the Oracle APEX Card region.
How to make it work?
For this demo, I use the Unsplash dataset available on GitHub, then I upload the file with the Data Workshop utility.
Card region settings
Getting the data (SQL query)
First, we have to create a Card region on the page and write a query to get the list of photographers and a pipe-separated list of values of their photo's URLs.
with photographer as (
      select photographer_username,
             photographer_first_name,
             photographer_last_name,
             count(*)
        from unsplash_data
       group by photographer_username,
             photographer_first_name,
             photographer_last_name
      having count(*) >= 5
   )
select p.photographer_username,
       p.photographer_first_name,
       p.photographer_last_name,
       (
          select listagg(ud.photo_image_url, '|') within
                    group (order by photo_id)
            from unplash_data ud
           where ud.photographer_username = p.photographer_username
             and rownum < 6
       ) as photo_urls
  from photographer p
Note: to make the demo simple, I managed to only get the photographers that have a minimum of 5 photos and I only pick the 5 first.
Setting the attributes
The first attribute we have to define is the title of the card, I want to display on top the first and last name of the photographer and below its username. To achieve it, I enable the advanced formatting:
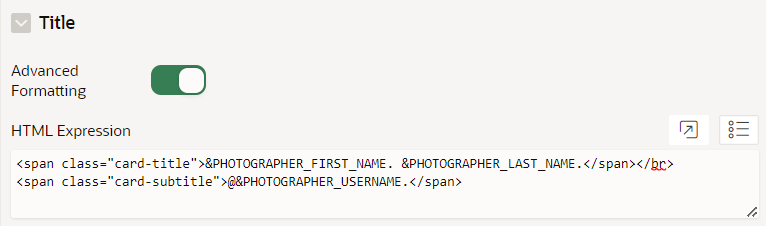
Here is the HTML Expression:
<span class="card-title">&PHOTOGRAPHER_FIRST_NAME. &PHOTOGRAPHER_LAST_NAME.</span></br>
<span class="card-subtitle">@&PHOTOGRAPHER_USERNAME.</span>
The second attribute to be set is the Media one, and this is here that we will use the Template Directives. If you haven't heard about it, look at the resources section at the end of the post, you will see the links to two excellent blog posts and the official documentation.
As for the title, we will enable Advanced Formatting and add the following HTML Expression:
<div class="carousel_container">
   {loop "|" PHOTO_URLS/}
      <div class="carousel_snap" >
         <img class="carousel_image" loading="lazy" src="&APEX$ITEM.?q=75&fm=jpg&w=400&fit=max" data-num="&APEX$I." ></img>
      </div>
   {endloop/}
</div>
We need to explain a bit that part because you have to understand the power of Template Directives! We use the directive {loop "|" PHOTO_URLS/} ... {loop} which will
Split the content of the PHOTO_URLS column by using the specified separator (pipe here)
Loop through the list and make the following values available:
&APEX$ITEM. - the current value
&APEX$I. - the index of the current value
Output the HTML with the values substituted
Here is how it looks like in the APEX Builder

Note: don't forget to add the custom CSS class carousel_media 👆
The last attribute is the JavaScript initialization function to add a Load More button instead of the default pagination. I talked about that in a Monday's Tip for Oracle APEX and it's quite nice
To enable it, make sure that pagination is set to Scroll and add the following JavaScript in the Initialization's attribute:
function( options ) {
    options.pagination.loadMore = true;
    return options;
}
When we are done with the configuration, try to run the page
Euh, wait, this doesn't look like a carousel at all... I maybe have forgotten to add some CSS rules there isn't it?
Unleashing CSS Magic ✨
Here is the CSS code you have to paste into the CSS\Inline attribute of your page:
.card-title {
    font-weight: bolder;
}

.card-subtitle {
    font-weight: lighter;
    font-size: smaller;
}

.carousel_media {
    flex-direction: column;
    padding: 0px;
    height: 300px;
}

.carousel_container {
    display: flex;
    overflow-x: scroll;
    scroll-behavior: smooth;
    scroll-snap-type: x mandatory;
    height: 300px;
    column-gap: 1rem;
    width: 100%;
}

.carousel_snap {
    scroll-snap-align: center;
    display: flex;
    flex-basis: 100%;
    flex-shrink: 0;
}

.carousel_image {
    width: 100%;
    object-fit: cover;
}
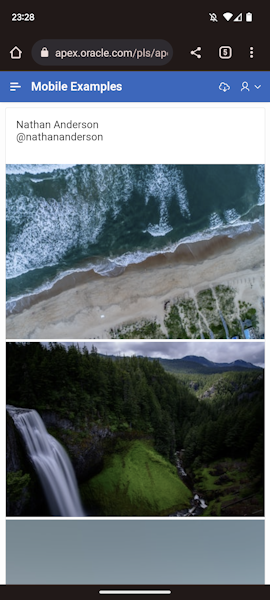
Save and run the page much better isn't it?
Bonus Points: Adding Carousel Indicators for Enhanced User Experience
If you have watched the YouTube video, you have seen that when you scroll to see another image in the carousel, the dots at the bottom are updated accordingly. Let's see how to implement that
Updating HTML Markup for Carousel Indicators
Add the following HTML at the bottom of the Media HTML Expression:
<div class="carousel_dots">
    <span class="fa fa-circle carousel_dot" data-num="1"></span>
    <span class="fa fa-circle-o carousel_dot" data-num="2"></span>
    <span class="fa fa-circle-o carousel_dot" data-num="3"></span>
    <span class="fa fa-circle-o carousel_dot" data-num="4"></span>
    <span class="fa fa-circle-o carousel_dot" data-num="5"></span>
</div>
Styling Carousel Indicators with CSS
Add the following CSS rule to display the dots nicely
.carousel_dots {
    display: flex;
    position: absolute;
    bottom: .5rem;
    gap: 0.5rem;
    color: white;
}
Synchronizing the Carousel Indicators while Scrolling: The Intersection Observer API to the rescue
According to MSDN, here is what this API does:
The
IntersectionObserverinterface of the Intersection Observer API provides a way to asynchronously observe changes in the intersection of a target element with an ancestor element or with a top-level document's viewport. The ancestor element or viewport is referred to as the root.
In other words, when you create an observer and start observing an element, a callback will be called when the visibility of this element regarding the root is updated.
Let's add a dynamic action on the "Page Change [Cards]" event
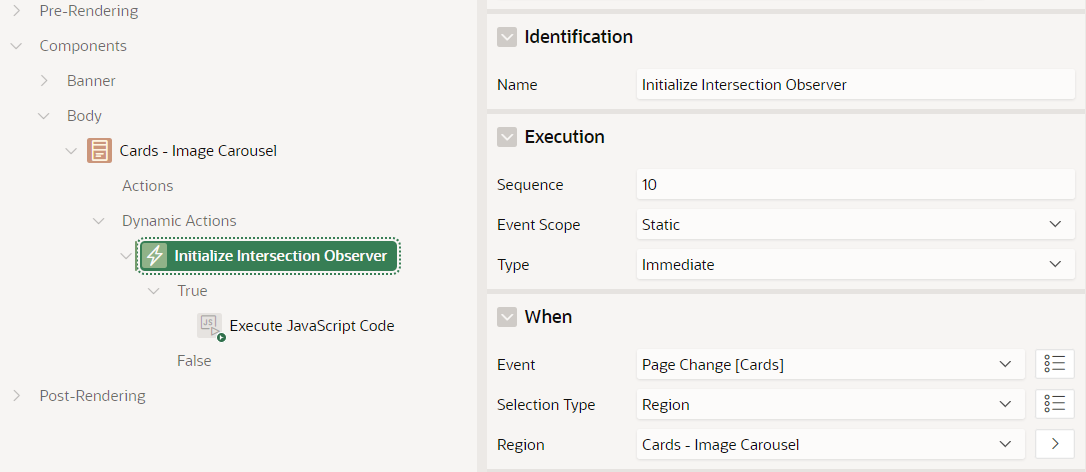
Add to this DA, an action of type Execute JavaScript Code
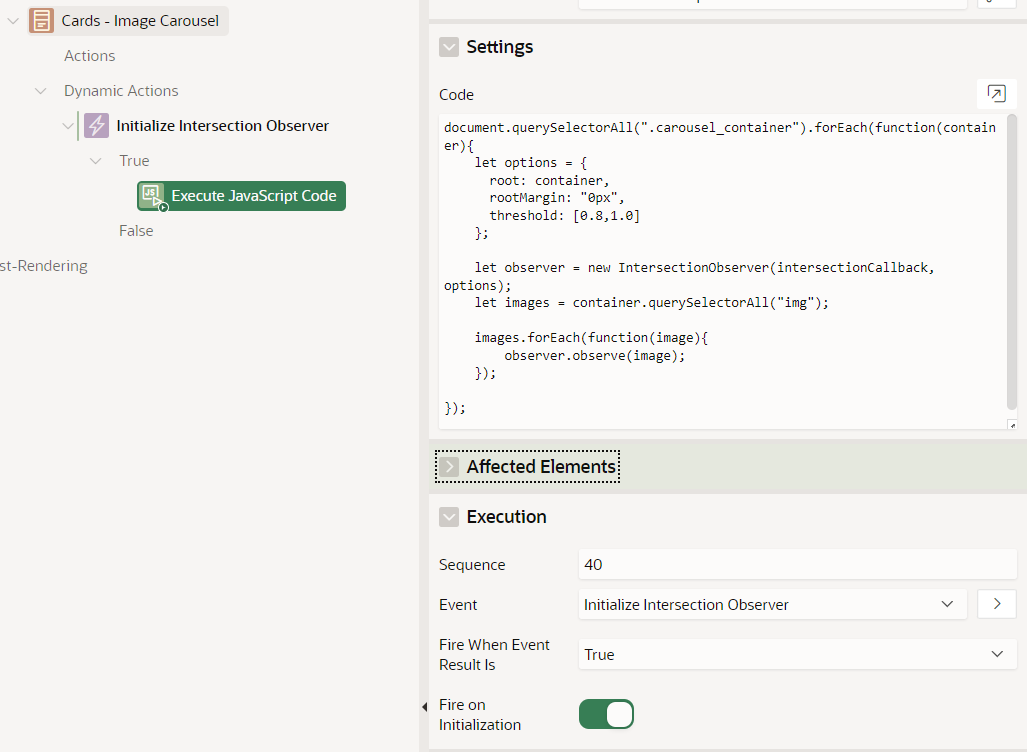
Here is the JavaScript Code:
//Loop through all the carousel containers
document.querySelectorAll(".carousel_container").forEach(function(container){
    //Declare the IntersectionObserver options
    let options = {
      root: container,
      rootMargin: "0px",
      threshold: 1.0
    };

    // Create the observer
    let observer = new IntersectionObserver(intersectionCallback, options);

    //Get all the images inside the container
    let images = container.querySelectorAll("img");

    // Loop through all images and start observe it
    images.forEach(function(image){
        observer.observe(image);
    });

});
The final step is to declare the intersectionCallback function by adding this code to the Function and Global Variable Declaration attribute of the page:
function intersectionCallback(entries) {
    // Private function used to update the dots
    function updateDots(container, num){
        // Get all the individual spans
        let dots = container.nextElementSibling.querySelectorAll(".carousel_dot");
        //Loop through the dots
        dots.forEach(function(dot){
            // extract the data-num attribute
            let dotNum = dot.getAttribute("data-num");
            //Add or remove the dot's classes depending on whether it's the selected image or not
            if (dotNum === num ) {
                dot.classList.remove("fa-circle-o");
                dot.classList.add("fa-circle");
            } else {
                dot.classList.add("fa-circle-o");
                dot.classList.remove("fa-circle");
            }
        });
    }

    // This loops through the entries providing in the callback
    entries.forEach((entry) => {
        //If the image is 100% visible
        if (entry.isIntersecting === true && entry.intersectionRatio === 1) {
            // Get the image, image num and parent to update the dots
            let image = entry.target;
            let parent = image.closest(".carousel_container");
            let imageNum = image.getAttribute("data-num");
            updateDots(parent, imageNum);
        }
    });
}
Save and run the page and it should work like a charm!
Try it with mobile devices only as it has not been designed to work with Desktops 😉 https://apex.oracle.com/pls/apex/r/louis/mobile-examples/card-image-carousel
Conclusion
In this blog post, we have learned how to implement a nice image carousel to work with the Oracle APEX Card region. I learned a lot while writing this one mainly about the Intersection Observer API but also about the Template Directives and even about a few CSS rules. And actually, this is why I started this blog to learn and share with the community!
Don't forget to look at the Resources section below, you might find some useful links. And, please, don't hesitate to drop a comment here or reach out to me on social media, getting feedbacks is always appreciated 🙂
Resources
Here is a list of links that you might want to look at to go further on the subject
APEX Template Directives by John Snyder
Client-Side Formatting with APEX Template Directives by Jon Dixon
Builder User's Guide and apex.util documentation
Intersection Observer API on MSDN
CSS Scroll Snap on MSDN
Practical CSS Scroll Snapping on CSS-Tricks
CSS Scroll Snap (CodePens' collection) by Adam Argyle
A CSS-only Carousel Slider (CodePen) by Christian Schaefer


